Methods for a Double Gate Fold –
New to print finishing? Here are some tips from the pros on folding double gate folds…
If you are new to producing your own printed work, you may be surprised at the complexity of what happens to a job after it’s printed. There are, for instance, hundreds of ways that any given sheet of paper can be folded. This area of expertise is known variously as print finishing, bindery work, or post-press work.
But you don’t need to be an expert to produce professional looking, expert-quality finishing work. There are some tricks of the trade you can use to duplicate the type of work done on expensive, specialty folding machines.
One such fold is the double gate fold in which two panels fold inward, similar to a gate. Then it folds in half where the two ‘gates’ meet. It’s a popular design used by graphic designers and printers around the world.
Such a gate fold normally requires a special folding machine attachment for automatic high-speed production. There are two ways to do this without the attachment, but they add a manual labor step to the process. But since you are doing short run work, this manual step adds very little to your cost and lets you easily produce such jobs in-house.
Method 1 requires three fold plates. Method 2 can be done using any table top folding machine with at least two fold plates. There is also a way to do this without a folding machine, which I’ll get to in just a minute.
For all methods, be sure to cut and fold panel ‘A’ at least 1/32” shorter than the outer panels. This is to prevent the edges of the two ‘gates’ from hitting each other and bending during the final fold in half. If they are too long, the final fold won’t work. If they are too short, it might be visually disturbing to the customer. It’s always a good idea to cut a small amount and test first until you are sure of your cutting and folding skills.
Method #1 for a Double Gate Fold
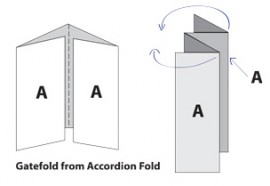
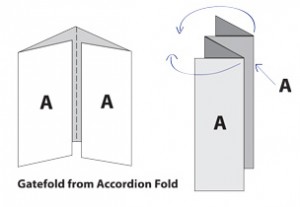
Step 1: Use your folder to make an accordion fold with panels ‘A’ on the outside. This fold uses 3 fold plates, usually #1, 2 & 3, each set to the same fold length.
Step 2: Manually fold the accordion inside out with panels ‘A’ now facing each other on the inside of the fold.
Method #2 for a Double Gate Fold
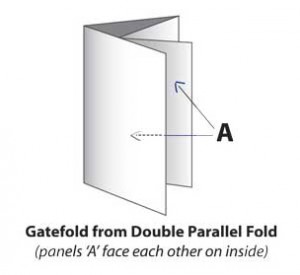
Step 1: Do a double parallel fold. This is two folds in which the sheet first folds in half, then in half again. (see photo lower right)
Step 2: Unfold the paper and manually re-fold it so that you have the double gate fold. You can adjust the two folds so that the gates meet properly. Again, be sure there is a slight space between them so that you can do the final fold without bending the edges of the gates.
Method 2 is probably a little more accurate. It’s generally easier with smaller folding machines to maintain consistency using the double parallel fold than with the 4-panel accordion fold. However, with Method 1 the re-folding step is a little faster.
As I mentioned before, if your print job is on a cover stock or similar heavy paper, you can do this without a folding machine. In fact, it might even be easier and faster to skip the folding machine if the quantity is not too big.
With cover stocks you will have to crease (score) the sheet precisely on the fold locations. A good crease will let you quickly fold any cover stock by hand and will prevent the paper from cracking or tearing. Creasing machines such as the CreaseStream Mini Series can apply all three creases at once.
Creasing will also improve the quality of your double gate folds on many of the bulkier text weight stocks. This is especially true in those cases where digitally printed or copied sheets start to crack or tear. A proper crease will eliminate that problem as well as aid in folding.
Just remember to take your time and test with a new job. With a little practice you’ll be able to quickly produce hundreds of high-quality double gate folds.


